Pull-aparts are a simple resistance band exercise with tons of versatility. No matter your fitness level, you can pair pull-aparts with varying band resistance levels to make them as challenging as you need them to be. Like other resistance band exercises, this move is significantly more convenient than others that rely on gym machines or free weights.
Important back and shoulder muscles are the main beneficiaries of pull-aparts. Including pull-aparts in your workout routine can help cover ground where other shoulder exercises like bench presses might not have reached.
As with any other exercise, you need to have the right form to get the most out of pull-aparts and prevent possible injury. There are also a few variations of banded pull-aparts that will give a greater benefit and let you target different muscles.
Read on to find out everything you need to know about resistance band pull-aparts, how to do them, and how you can incorporate them into your workout routine for the best results.
(Note: Want our elite trainers to build a workout that works for your schedule? Start your Fitplan free trial today!)
How to Do Band Pull-Aparts
Before we get into variations and how to execute the perfect pull-apart, let’s cover the basic steps. It’s a straightforward exercise. All you need for the most basic version is a resistance band.
Follow these steps to execute a band pull-apart:
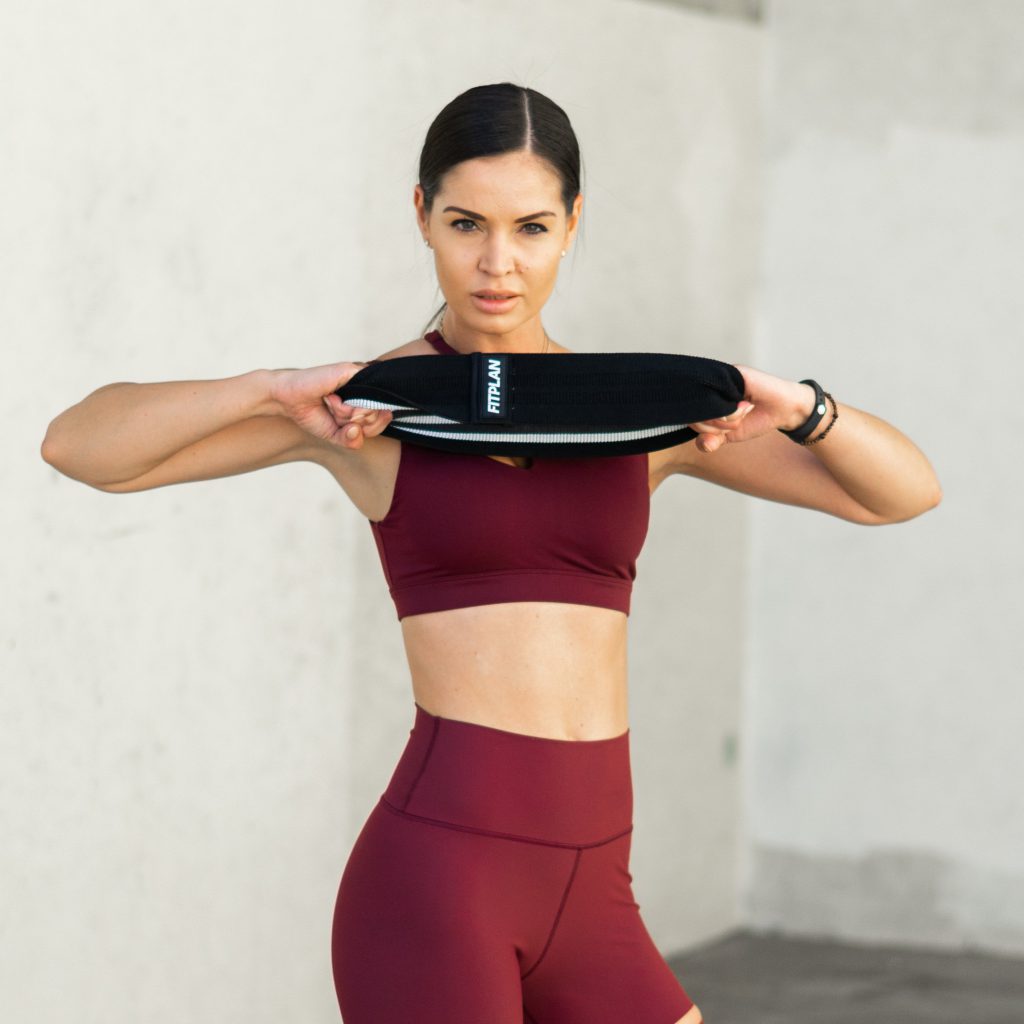
Stand with your feet about shoulder-width apart and take one end of a resistance band in each hand with an overhand grip.
Lift both hands so that they’re at shoulder-height and directly in front of your shoulders. They should be completely outstretched but don’t lock out your elbows.
Pull the band by moving your hands out to either side. Keep the resistance band at the same level and don’t bend your elbows or change their position.
If possible, continue stretching the band until your hands are out to the side and in line with the shoulders. Hold at the furthest point of the movement and then slowly return to the starting position.
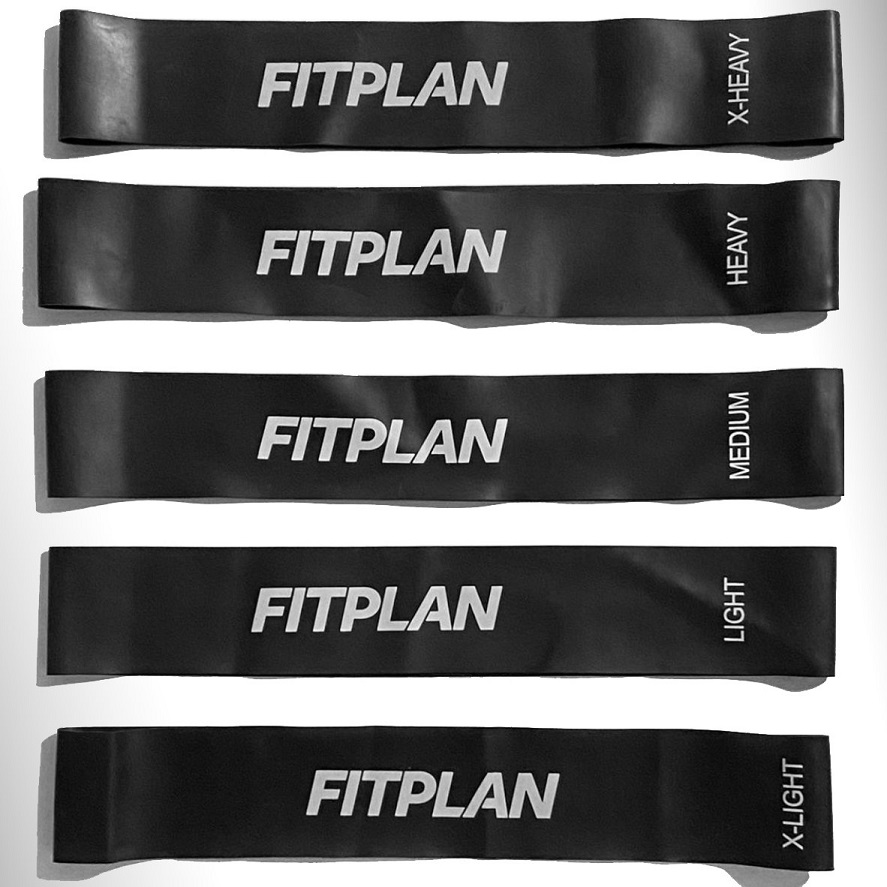
Choosing a Resistance Band for Banded Pull-Aparts
One of the best things about pull-aparts is that you can perform them with basically any type of resistance band. Some work better than others, but as long as you can get a grip on two opposing sections of a band and have room to stretch it, it should work for this exercise.
A standard therapy band that doesn’t connect at the end will work. Just grab it near enough to the ends that it has no slack and you can continue with the motion of the exercise like normal. Loop bands should be gripped the same way.
Some people like to put a loop band over their heads and leave it running over their shoulder blades. The other side of the loop band will then be in front of you right at shoulder-height where you want it. Other varieties of resistance bands with handles might offer a better grip, but they also won’t help you build grip strength for pull-ups, bench presses, and deadlifts.
Helpful Hint: Tone your existing muscles and build grip strength with our Train Smart Fitplan!
The resistance level is also an important consideration when choosing a resistance band for band pull-aparts. Because the exercise itself looks and feels so simple, bodybuilding enthusiasts frequently pick up the band with the highest resistance they can find.
This logic makes sense, but it could very well limit the benefits you get from pull-aparts. If you can’t pull the band far enough to put your shoulder joint and shoulder blades through their full range of motion, you won’t be pushing your muscles to their limit. Even if you find less resistant bands very easy, just add more reps to your pull-apart sets.
Muscle exhaustion is great for causing damage and increasing hypertrophy, but it’s always better to get your muscles through their full range of motion for many reps than it is to wear them out with a few reps that don’t push them as far. There’s also safety to consider: if the band is too resistant, you’re more likely to lose your grip and suffer an injury when the band snaps back.
Band Pull-Aparts – Muscles Worked
As you can probably tell from the description of this exercise, it focuses on the upper body. Specifically, your shoulders and upper back muscles will bear the brunt of the resistance from the band. Band pull-aparts work your rhomboids, rotator cuffs, rear deltoids, and trapezius muscles.
Your rotator cuffs are incredibly important for any kind of shoulder movement. The rotator cuff has to be able to move in many different ways and directions, which means it needs tons of stability to prevent injury. Building strength in the surrounding muscles with pull-aparts and similar exercises is a great way to do just that.
The other three muscles – the rhomboids, rear delts, and trapezius – work together to create shoulder blade protraction and retraction. Protraction is when the shoulder blades move forward and farther apart, while retraction is when they come closer together. In addition to facilitating shoulder blade movement, building strength in these three muscles will also help prevent rounded shoulders, as well as back and shoulder pain.
These three muscles work whenever the shoulder has to move toward or away from the rib cage. But it’s not only about shoulder movement. Basically, any time your arms need to go forward or out, the shoulder blade is involved. Pull-aparts can help generate more power in these arm movements, which is great not only for daily activity but also for bigger lifts at the gym.
Band Pull-Aparts: Form Notes
They may seem like the simplest exercises ever, but there are a few key ways people frequently undermine the effectiveness of their pull-aparts. Keep these tips in mind when you go through the exercise so you can maintain proper form:
Don’t Round Your Shoulders
When done properly, pull-aparts help prevent or repair rounded shoulders. However, many people try to fight the resistance in the band by moving their shoulders forward or hunching the thoracic spine, which runs between the shoulder blades.
Keep your spine neutral for pull-aparts and all the variations of the exercise.
Let Your Shoulder Blades Relax
The shoulder blades will be taken through their whole range of motion in one direction during this exercise. Lots of people lock their shoulder blades into place when they do pull-aparts, but that prevents them from being able to go through their natural range of motion. It’s also very likely to lead to neck and shoulder pain.
You don’t need to flex or clench your shoulder blades. Just let them sit where they want to as you go through the pull-apart motion.
Arm Position
The start and end positions of the arms are important for this exercise. They should be on the same level throughout. Any movement that requires them to go up or down is probably not right unless you’re doing a variation that specifically has the arms overhead or elevated over the shoulders.
When you finish, the arms don’t need to be behind your torso. Once they’re in a T-shape and the resistance band is touching your chest, you’re at the end of the movement and you can return to the starting position. Going too far can cause shoulder pain or over-extend the shoulder joint and cause strain or another kind of injury.
How Resistance Band Pull-Aparts Fit Into Workout Routines
The simple movement and lack of preparation required for this exercise make it ideal for use as a warm-up or cool-down activity on arm day. If your shoulders and arms have already taken a beating, you can use the band pull-apart as a finisher to bring them back down to a normal level to avoid soreness. You can also prime them for more intense activity.
If you’re building a HIIT routine where rest time between exercises is minimalized, the pull-apart might just be the perfect tool for filling in those rest intervals with meaningful physical activity. Regardless of how you fit them into your particular routine, you’ll want to run through a minimum of 15 pull-aparts for each set to make sure your delts and other scapular stabilizers are getting a thorough workout.
Helpful Hint: Throw some pull-aparts in at intervals during our Bodyweight Power Fitplan!
7 Resistance Band Pull-Apart Variations for Maximum Efficiency
Many would-be powerlifters and gym rats are perplexed with the lack of strength in their upper back and shoulders. Even when they incorporate pull-ups, chin-ups, and other great back workouts into their routine, they just still can’t seem to build enough strength in these areas.
The basic pull-apart will help rectify that situation. You can alternate between it and the following variations to make sure you build as much functional strength in your upper back and shoulders as possible.
1. Variable Grip Pull-Aparts
You can change up your grip for various benefits when you’re doing pull-aparts, or you can alternate between all the possible grips to build versatile grip-strength for a variety of lifts and situations.
The overhand grip with your palms facing the ground is the most common way to execute a traditional pull-apart. You can also use the neutral grip with your palms facing each other or the underhand grip with your palms facing the ceiling.
A wide overhand grip builds the upper lats and your teres major, a muscle near but not connected to the rotator cuff that helps move the upper arm. An underhand grip helps develop the entirety of your latissimus dorsi all the way down to your hips. If you want to build a broad, strong back, you should alternate between these grip styles in your pull-aparts.
2. Overhead Pull-Aparts
If you want to bring your biceps into the picture a bit more, try this variation. It’s just as simple as the original but it adds new movement.
Begin in a starting position with the resistance band in each hand with an overhand grip and your arms fully extended overhead. Pull the ends of the resistance band out toward both sides and slowly move the band down behind your head. You’ll need to bend your elbows toward a 90-degree angle to allow for this movement.
Once you get the resistance band to your shoulders, you’ve reached the lowest point of the exercise. Slowly move it back to the starting position to complete one rep.
3. Incline Pull-Aparts
This variation is similar to the overhead pull-apart except the starting position has you holding the resistance band up and away from your torso rather than directly overhead. Your palms will tilt more toward the ceiling as well. Most importantly, you have to put one foot forward with its knee bent like you’re halfway through a lunge.
From this starting position, stretch out the resistance band while simultaneously bringing it down until it touches your pecs near the top of your shoulders. Just like with normal pull-aparts, there’s no need to extend past this point. Slowly return to the starting position once the band touches your chest.
Helpful Hint: Run through more complicated exercises as part of our Slay the Weights Fitplan!
4. Lateral Pull-Aparts
A simple lateral step adds a dimension of lower-body exercise to the pull-apart. If you’re feeling adventurous, you can put a loop band around your legs above the knee to give your glutes, quads, and hamstrings an extra challenge.
The starting position is exactly the same as a basic pull-apart. Bear in mind that you’re going to take a lateral step that’s a bit larger than your normal stride, so if you start with your feet too wide, making that movement might be a bit difficult.
As you stretch the band out and move your hands out to your sides, take a sideways with your right foot. Bring your left foot into the right foot’s previous position as you’re returning your arms to the starting position. You can “walk” like this or you can simply reverse direction every other step to take up less space.
5. Curtsy Pull-Aparts
Similar to the curtsy lunge, this is a nice bodyweight exercise that will challenge muscle groups all over your body. Since it requires coordination between what are essentially two exercises in one, it can take some time to master completely. Take it slow and you’ll learn this great move in no time.
Use the same starting position as a traditional pull apart with your arms out in front of you. As you stretch the resistance band, cross your right leg behind your left and bend your left knee until the left thigh is parallel with the floor. Bring the right leg back as you bring your hands closer together and then repeat the movement while crossing the left leg behind the right.
6. Pull-Apart Jacks
Add a bit of cardio energy to your workout routine with this combination of a pull-apart and a jumping jack. You won’t have the same overhead range of motion in your arms as a jumping jack, but you will get a small amount of plyometric energy out with each rep.
Start with your feet about hip-width apart and the band lifted in front of you just as in the normal pull-aparts. Pull the resistance band while simultaneously jumping up and landing softly with your feet wider than shoulder-width apart. Jump up again and return your feet to hip-width while bringing your hands closer together at the same time.
This move is one of the easiest to do too quickly. It does require some additional speed to keep your hands and legs moving at the same pace. Make sure you try this move with a resistance band that you can stretch quickly without risking injury.
7. Bent-Over Pull-Aparts
Mimic the starting position of rows and deadlifts with this pull-apart variation. It will give you even more upper back strength and prime your hamstrings in preparation for those more complicated lifts in the future.
All you need to do for this move is hinge at the hips with a straight torso. Make around a 45-degree angle with your upper body. The rest of the move is basically the same as a traditional pull-apart. Rather than having your arms straight out in front of you, though, you’ll have the band almost touching your shins beneath the knees.
Stretch the band until your arms make a T-shape and the band touches your chest. Make sure to keep your arms aligned so that they go out straight. The band shouldn’t touch your stomach or lower chest – it should touch just beneath the shoulders.
Helpful Hint: Put your new back and shoulder strength to work with our Busy Body Fitplan!
Conclusion:
Like other resistance band exercises, pull-aparts are great warm-ups and easy to do pretty much anywhere whenever you have time for a quick exercise. You don’t have to limit them to the warm-up or cool-down period, though. You can also use them to fill in a HIIT routine or as part of a larger resistance band workout routine to build strength and muscle mass.
Use the band pull-apart variations in this guide to change things up and keep your body from adjusting to the pull-apart motion. Whatever your fitness goals, the band-pull apart is a great addition to your workout plan.
(Note: Want our elite trainers to help you optimize your resistance band workouts? Start your Fitplan free trial today!)